2017 was an okay year but life got in the way of blogging. We’re now about halfway into the first month of 2018 and it is shaping up to be a busy one for me.
This year, I will:
Go back to Uni. I haven’t been in school for over a decade so who knows what I am in for! I’ve just been accepted into a postgraduate teaching program and will be doing my course online. Exciting days…
Finally get my driving license back. No, I haven’t lost it due to driving erratically (LOL, I am not that adventurous). I just never really had the time to convert my license since moving to Australia. I’ll be starting from an L-plate like a teenager and I’m already anticipating the curious glances from other drivers. Ha.
Not have a child in the house for a few hours once a week! Hooray for occasional care.
Have to get my act together and work on the garden. This spring/summer has been a total write-off for us as far as the garden is concerned.
Try to find my blogging mojo back. I will probably not be blogging as often, but at this stage I’m hoping to post at least once a month. It is good to account for what I’ve been doing after all.
Keep working at bringing the mortgage down. At the moment, there are a couple of unplanned expenses in the pipeline, so I will have to rework the budget soon.
Small steps everyday. And keep CALM. This is my word for this year.
We’ve harvested the first of the ginger and turmeric this week. I just love digging the yellowing plants up to find the tubers underneath. Nothing beats the taste and smell of freshly harvested aromatics.
Here is our small garden harvest tally for January-May.
Our garden harvest tally for the year to date.
We’ve not spent a single thing on the garden this month, so all the harvest has gone straight into the positive side of the balance. Chokos are still a-plenty, and there’s about three-fourths left for the ginger and turmeric harvest. We grow them in pots more than 40cm wide, and reserve some tubers every year for replanting. I would love to grow galangal but, having tried twice before, I hesitated to replant them last summer. I might give it another go this year.
Work has started on our small kitchen refresh, and we expect it to continue until the week of the Queen’s Birthday holiday. We’ve gotten all the quotes in and it looks like we’ll be coming in at slightly under $5k (the budget we’ve set). Fingers crossed it all works out…
Mr Meagre hard at work. Today is the day for smashing the splashback tiles and sanding. We’ve chosen Taubman’s Endure Crisp White for the walls (there aren’t many brands approved as asthma-friendly).
This week, I’ve also completed my fermenting/bread-proofing setup for the winter. I’m using a Mangrove Jack’s Heat Pad coupled with an MKII temperature controller. As a first project, I’ve made up some kimchi using the freshly-harvested ginger.
My trial setup for winter ferments, and bread proofing. I’ve set the temp to 20 degrees Celsius for the kimchi.
My second batch of Kombucha had sadly developed mould, probably due to prolonged cold weather. I will have to find another scoby now and pop it onto the fermenting heat pad next time…
I miss my breadmaking challenge but it will probably have to wait until the kitchen is done!
We went for a quick drive up to the Macedon Ranges today and got back early. It has given me enough time to roam quickly through the garden and see what’s out there.
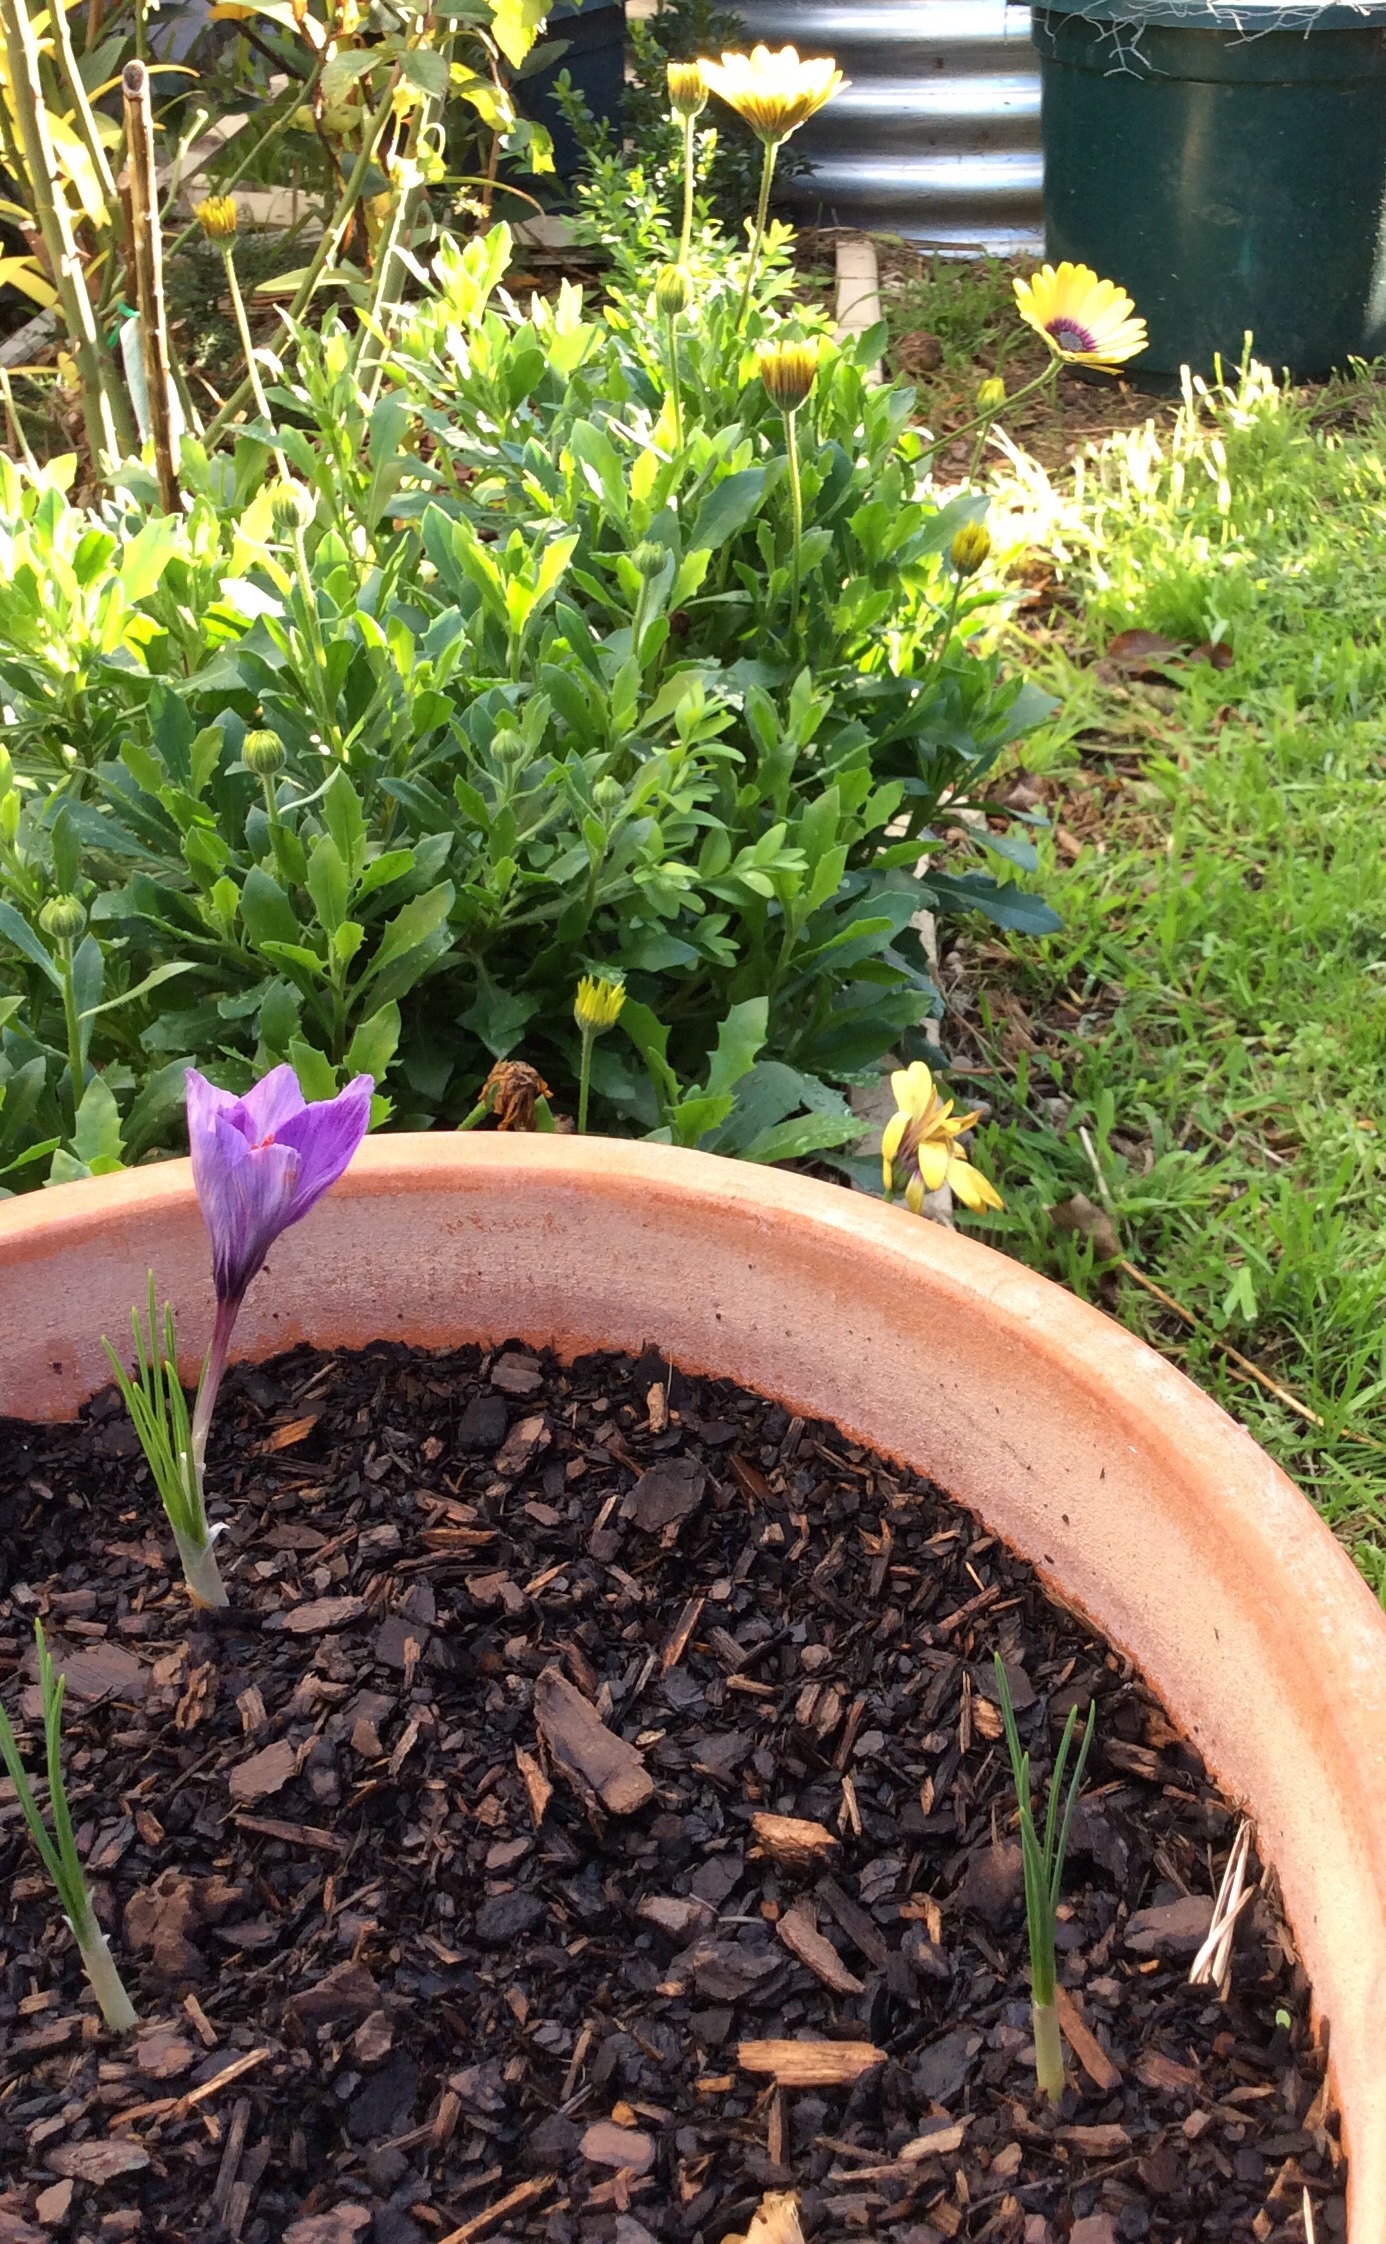
A sea of choko leaves covering the archway. We’ve harvested 4 kilos of chokos this month — more than enough to eat and share with friends. The vine is beautifully impressive. Hard to imagine it grew from just two chokos chucked into the ground. Just below it (in the foreground) is one of the garden beds dedicated to early season garlic. The potted dwarf mango with its last flush of growth before the winter cold sets in. Saffron Crocus potted up and Blue-Eyed Yellow African Daisies flowering in the background. In the front yard, we’ve just planted up the tulips after cooling them in the fridge for four weeks. I love the Blue and Purple Salvias growing in the mini orchard. They’ve been interplanted with lavenders to attract pollinators for the citrus and pome fruits. Soon, they’ll be replaced with a sea of yellow daffodils. Winter is definitely citrus season. These are small, round cumquats potted up beside the back door. The Lisbon lemons are still green, but the single Yuzu has been picked off the tree. I’m hoping there will be seeds to plant up when I cut up the fruit later.
We’re eating the fresh pomegranates this week and cannot wait until the silverbeet is ready to harvest. Lots more to do in the garden in the coming month! How are you going with yours?
I have missed blogging! It has been a terribly busy week here at the Meagre home and I can barely keep up with the work of every day.
Today was a bit of a breather for me and I was finally able to make some soap for the Hanger Swirl Challenge over at the forum. I’d decided at the last minute that I would do a Butterfly Hanger Swirl like the one at Handmade in Florida.
My soap curing for the Hanger Swirl challenge.
I wanted to use four colours (black, deep purple, red and white) as I had a Black Raspberry Vanilla FO from Kim and Gavin’s Little Green Shop. The deep purple for the blackberry colour turned out greyish so I couldn’t differentiate it from the black. It’s my first natural colourant soap so I’m excited to unmould it nonetheless. This one had alkanet, madder root, titanium dioxide, and activated charcoal.
While waiting for the laundry to get done (so I could use the powerpoint for the stick blender to make soap), I decided to roast some coffee beans using my Handy Roaster. I opted for a light roast this time.
Using my Handy Roaster and the portable butane Gasmate to get a light roast. These coffee beans are from Nicaragua (bought from Di Bella Coffee at QLD).
We’ve also been busy getting quotes for a small kitchen refresh we’ll be getting done next month. It is certainly difficult working with a small budget for a kitchen makeover. We’ve been scouring online factory clearance shops and so far, we’ve been able to purchase the gas cooktop, canopy rangehood and a sink package. All have been purchased for about 70% off. We’re targeting a budget of 3-5k which seems very tight for a kitchen refresh.
Mum and MIL are enjoying their stay here and have decided to learn breadmaking. Looks like I’ll be taking them along at my baking challenges!
I’ve been stepping out of my comfort zone lately and trying my hand at fermenting. I’ve always had many allergies, including hay fever, asthma and eczema flareups. Well, the past week with a badly infected hand was the last straw for me and I have finally convinced myself (I think) that it would be safe to consume uncooked food or drinks that I’ve fermented (apart from yogurt, that is).
More than a week ago, my Kombucha scoby arrived thanks to a lovely lady known as Kasalia on the forum (read about her adventures at Tales of Time). However, after moving containers thrice, I think I’ve just about got it right this time around. Long story, but with the first container (a ceramic jug), I was nervous about lead leaching from the jug. And with the second container, I had stupidly thrown out more starter tea than I should have. I then added a tablespoon of distilled white vinegar once I realised my error, in a desperate bid to keep my scoby alive. So, after a trip to Kmart looking for a suitable jug, and a health food shop looking for unpasteurised, unflavoured Kombucha… I now have it brewing on the benchtop beside the coffee machine. Third time lucky, I hope? The good thing about it all is that I have gotten my husband and daughter to try the shop-bought, flavoured Kombucha and neither of them threw up!
After a few misses (and no hits!), my Kombucha is finally brewing. Fingers crossed.
Wih my sourdough starter in the fridge, the space it normally occupies (on top of the coffee machine) is empty. So after asking around on the forum about water kefir, I have finally decided to give the Mad Millie Kefir Culture a go. I found it strange, though, that there were no instructions on adding it to plain spring water! Luckily, we were able to find coconut water on special at Coles so I’ve just mixed that in a few hours ago. Now to research what to expect, and how long it will take for the kefir to be ready. With any luck, someone here might like it, and then I could find some water kefir grains.
“Instant” coconut water kefir fermenting in a Moccona jar. Everything is labelled so nobody will mistake my potions for iced tea or some other palatable drink. I am sure Mum will be commenting about my kitchen escapades again!
Mum and mum-in-law are finally arriving for a holiday this Saturday, so hopefully I can have some time to try sauerkraut and kimchi. Or have I become too ambitious? LOL.
A fermenting crock waiting for the sauerkraut and kimchi that I should be making soon. Thanks to Kylie at Home’s my Haven for the tip-off.
I should be making some soap next week as well for the Hanger Swirl challenge over at the Home Maker’s Forum, so I must really figure out how to schedule everything!
I am sure many of you make your own fermented food and drinks — maybe you have some tips for me? I still feel a bit jittery about this latest adventure, but once I get through it, maybe pressure cooking and canning could be next? Ha.
Over at the Home Maker’s Forum, some of us have been busy sharing our sourdough baking adventures. It has been a lot of fun, although at times the difficulty of baking with something unpredictable becomes quite evident. We pummel on regardless — after all, nobody ever said that baking bread was easy! There is lots to learn and so many things worth trying.
Nanna Chel of Going Grey and Slightly Green has brought a blog to my attention and I am really enjoying it. It is called Home Joys, and in it, Gina writes about her interesting life raising six children and being active at their Church along with her minister husband. I am always amazed at people who live this way. She has also inspired me to make this loaf today — a Sourdough Marble Loaf, adapted from Home Joys’ Soft Rye Sourdough Bread.
Sourdough Marble Loaf
Makes 1 large loaf (baked in a 1-1/2 lb bread tin)
For the sponge, mix the following ingredients the night before baking (I mixed mine in the mixer bowl with a dough hook at about 4pm on Sunday):
220 grams light rye sourdough starter*
225 grams filtered water
66 grams light rye flour
78 grams wholemeal (wheat) flour
*My starter is kept in the fridge and maintained at 100% hydration, meaning, fed with equal weights of light rye flour and filtered water. On this particular occasion, the starter had just been fed roughly 24 hours before (Saturday afternoon) and placed back in the fridge immediately.
The next morning when the sponge is bubbly, add the following ingredients straight into the mixer bowl (I mixed mine at 8am):
70 grams wholemeal spelt flour
78 grams baker’s (bread or unbleached white) flour
18 grams olive oil
35 grams honey
13 grams powdered milk
Leave the dough for about 30 minutes to autolyse. In my case, I had to rush for school drop-off and didn’t get back until an hour later. Divide the dough into two bowls (about 380 grams of dough per bowl) and mix the following:
Dough partitioned; more ingredients added and kneaded in. Ready for the first rise in separate, slightly oiled bowls.
To bowl #1 (light dough):
6 grams gluten flour (optional)
3 grams fine salt
80 grams baker’s (bread or unbleached white) flour, holding off on the last 20 grams and only adding enough of it to make the dough come together into a ball
Knead the dough until it is smooth and let it rise in a slightly oiled bowl. To bowl #2 (dark dough):
6 grams gluten flour (optional)
3 grams fine salt
30 grams unsweetened cocoa powder
50 grams baker’s (bread or unbleached white) flour, holding off on the last 20 grams and only adding enough of it to make the dough come together into a ball
Knead the dough until it is smooth and let it rise in a slightly oiled bowl. Notes (added 10-May-2017): With some flours, more might be needed until the dough comes into a ball. Keep working slightly more flour in the first minutes of kneading, until the dough just clumps into a ball, while still being slightly sticky. With some trials I have done using flour from different sources, I have needed to add as much as 40 grams more.
When the dough balls have roughly doubled in size (it took about 4.5 hours for me, but sometimes it could take up to 8 hours), the loaf is ready to be shaped.
On a lightly floured board, gently roll out the light dough into a rectangle about 8 inches x 10 inches. Place the dark dough in the centre and proceed to roll it out gently on top. Roll the dough up into a log about 10 inches long.Pinch the ends to seal, and continue to roll the log until it is twice the length of the baking tin. Fold the log in half.Twist the halves together and pinch their ends together to seal.Lay the log gently inside the tin and fold the ends underneath. Allow the dough to proof until roughly double in size.I used the oven’s residual heat from a roast, so it took only 1.5 hrs for the proof.Preheat the oven to 180 degrees Celsius and brush the top of the loaf with milk. Bake for about 35 minutes, or until the top is golden brown and the bottom sounds hollow. I used a thermometer for this loaf and took it out when the temperature was about 90 degrees Celsius. Cool completely on a wire rack before slicing.
Despite the addition of cocoa powder, the loaf isn’t sweet and has nearly no hint of chocolate. It is quite disconcerting for me to eat it with a savoury filling, though, so I might add a bit of sugar and some chocolate chips or dried fruit next time. My daughter was more than happy to eat it because of the chocolate look, so I guess that counts as a win.
More sourdough experiments coming up in the following weeks, so I hope I am not boring you with all of these!
Just a quick note from me to let everyone know that I won’t be baking the bagels today. Unfortunately, I have managed to infect a (very) small hand wound, probably when I gardened over the weekend. I woke up yesterday with a sore left arm and swollen armpit lymph nodes, so I just knew a trip to the Doctor’s was needed. She’s put me on antibiotics for seven days, with a stern warning to come back this Friday if things don’t get better. I’ve got my left hand bandaged to within an inch of its life, so kneading is obviously not an option.
The culprit. Yes, it’s my left palm buried under all of the Band-Aid.
While I’m out of commission, I thought I would share a recipe passed down from my uncle, who used to own a bakery in my hometown. I think I’ve mentioned before that neither Mr Meagre nor I were born here, and even though Australia is our home, I still fondly remember waking up to the smell of freshly baked Pan de Sal. (Of course, the experience of riding a carabao who suddenly decides to bathe in the mud will not be topped. I just happen to prefer the smell of bread over the stench of the mud bath.)
These bread rolls are akin to Dinner Rolls or Baps — although most Filipinos would usually have them freshly baked for breakfast, slathered with a bit of butter (or margarine) or a slice of cheese, with hot, black coffee. They were always a hit with the locals on New Year’s Day, because by then most people will have gotten tired of eating the rich, celebratory food of the holidays and just want to go back to a simple breakfast.
Pan de Sal
Kuya’s Pan de Sal
Makes 12 bread rolls
(Big Brother’s “Salt Bread” or “Bread of Salt”)
Ingredients
5 grams instant dry yeast
500 grams baker’s (bread) flour
10 grams salt
75 grams sugar
285-300 grams water
15 grams mild olive oil*
about 1/3 cup of breadcrumbs for rolling
*Traditionally, vegetable oil was used. However, most modern recipes call for melted butter and sometimes an egg is added. Both of these seem to improve the keeping qualities of the bread. In the olden days, I don’t suppose it was necessary — the bread was baked fresh every day at the baker’s.
Method
Mix the dough according to your preferred method. For this bread, I often use the bread machine on the normal dough cycle (or pizza dough if I am in a rush).
After the first rise, divide the dough into two and roll each portion into a log about 1.5 inch in diameter and a foot long.
Roll the logs in breadcrumbs. The dough should be slightly tacky, allowing the breadcrumbs to stick slightly.
Rest the logs for about five minutes.
Cut each log into pieces roughly 1-1.5 inch thick. There will be around 12-14 rolls for this recipe. The target weight is about 25-30 grams per roll, if you prefer to scale it.
Roll each dough piece in breadcrumbs and lay on a baking sheet cut side up. As the dough is proofing, it will get that oval outline on top which is typical of the pan de sal.
Proof the rolls for about 30-45 minutes.
Bake in a preheated oven at about 185 degrees Celsius (my conventional oven dial says 190C but the thermometer reads closer to 183 degrees Celsius.
The rolls will turn a light golden brown when they are done (in about 18 minutes), but some people prefer them a little more toasted.
Serve warm with some butter, cheese, or your preferred filling. These rolls are best eaten on the same day.
I hope you try them and let me know what you think. I will be mixing up some No-Knead Batter Rolls today to top up the bread tin. My daughter likes them in her lunchbox too — she refers to them as “that hat bread”.
Not much came from our garden this month, apart from the eggplants and some persimmons. Of course, the first of many chokos has also been harvested.
Our garden harvest tally for January-April.
As a result, the “money saved” for the year running has actually fallen sharply, from $75 last month to only $50 this month (we’ve spent a fair bit on compost and organic fertilisers). Our harvest in terms of weight is laughable at about 3kgs.
On the brighter side, the seedlings have continued growing and we’re nearly ready to put a few in the ground. The silverbeet I planted directly have come up, and they’re about a foot tall now. The early garlic is going gangbusters — we just need to weed the beds from time to time.
We’ve been discussing the possibility of growing tomatoes in the greenhouse over winter. We have kept tropical plants in there in the past and they have survived. Maybe the tomatoes will be a good experiment?
How has your garden been this month? It’s getting a tad cold for my comfort now and my feet are always chilly. The plants are obviously feeling it, too. I am looking forward to better times in the garden, as well as some soup and slow cooker meals with the harvest.
My apologies to all those who had received the unfinished post in error. I don’t really know what happened there but it was quite a shock to have received an alert that I had posted something when I hadn’t. LOL. Hope you all had a good weekend.
———————–
Since giving up our double income and excessive consumerism, we have learned to change the way we spend. As I look back on our changes, I see that very little has been removed from our lifestyle; if anything, our day-to-day living has become more indulgent without having to spend big bucks. By moving into a more active role and becoming more of a producer than a consumer, we are actually still living the luxe life on so much less than we used to.
Here are some of of our indulgent pleasures at home:
A cafe-style brekafast of sourdough toast, ham, and eggs. Cost: less than $1, and I can have it in the comfort of our home every single day. Each cafe meal like this would set me back by at least $9.Coffee, roasted to order. We’d recently run out of coffee beans, and to buy 3kgs of it would have cost us $100. This set above was $89 including the roaster, and the unroasted beans won’t go stale before we get to them. Plus, I get to have fun learning how to roast beans myself. Bonus!
Nibbling on fresh berries whilst out and about in our own backyard. The burst of flavour in my mouth is simply beyond any taste I have ever experienced from fruit bought from the shops. At the moment, our pomegranate is nearly ready to harvest — three fruits from a single young bush. It would have cost us over $8 to buy those — just a single fruit more and we would be breaking even on the cost of the plant. Fresh flowers every single day of the year. Right now, the African Daisies and Salvias are in bloom and the spring bulbs have just been poking their heads out. We buy our tulips and lilies in May, when all the good nurseries around Monbulk mark down the bulbs to half price. I can’t wait to harvest bunches of them in the spring. It costs us just $60 to get 100 bulbs delivered, and those flowers come back year after year with sufficient care. It boggles my mind how we used to spend $10 for just three stems of lilies every week.
There is so much more on my list — homemade cheese, yogurt, and a million other things that I am sure many of you make as part of daily life. I am so glad we’ve found our way out of consumerism, and I can’t wait to see what else this simple, gratifying life will teach us in the future.
The Rolls fresh from the oven.
The first thing I thought upon reading this week’s recipe was having a heart attack at the amount of bacon it calls for. I couldn’t bring myself to eat that amount of fat, so I’ve bought some short-cut bacon (rindless, fat-less) and used only 8 pieces of that (about 190grams).
Now, I dislike baking with cups because I am one of those people who get a different amount each time, even if I do the scoop-and-level method all the time. But alas, this is what I’ve chosen to do, so I stuck with the plan.
Using the bread machine this time to mix the dough. All ingredients are here apart from the eggs, melted butter, and about 2 tablespoons of the milk.The dough starts to come together after adding the eggs…But it’s still quite lumpy after adding the melted butter. I proceeded to add the remaining milk. In my early days of baking bread, I’d always been taught to hold off on the liquid just in case the conditions are more humid than usual, or the flour requires less of it.And finally the dough barely comes together, after adding all the listed ingredients. At this point, I was debating whether to add more milk or not.Dough after the first rise. In hindsight, I probably should have trusted my instinct and added a bit more milk. The dough doesn’t look like a lost cause, though, so I washed my hands and shook them dry, leaving them a bit moist for kneading.It took about two runs of kneading with slightly moist hands, to get the dough to a point I was happy with. I often do the same with dough that is too wet than I would like — I dip my hands in flour, and shake them off before kneading. It usually works well without destroying the bread’s structure, which often happens if the flour or water is just added straight into the dough after the first rise.I simply fried the bacon and onions together. As I was slicing up the onions, I did think that maybe it was a bit too much…
Here’s the dough after rolling out and filling… It is then cut up into 1-inch thick pieces and popped straight onto a baking sheet. The scrolls after final proof. No eggwash needed on this one.
The verdict? It was definitely a good decision to use short-cut bacon and reduce the amount drastically. I’ll probably cut down the amount of onions to half the next time I make it.
Despite my hesitation about the dough, it actually turned out okay — soft enough for the school lunchbox but filling enough for grown-up lunches too. I am happy I added a bit more liquid to the dough. I would have liked a little more rye and wholemeal flour, though. The eggwhite in the filling is also quite surprising and it left me wondering for a while where the velvety mouthfeel was coming from.
Overall, I’d say it did quite well — it was gone in less than 24 hours so I suppose it was good enough for everyone.
Next week, I would like to go back to my trusty Professional Baking book and make some Bagels.